Basic OpenCV operations: dealing with regions
Hey there! In another post I already started talking about OpenCV usefulness and described an example of pixels manipulation. Let’s move forward: this time we will manipulate entire areas of an image. This must answer the second question.
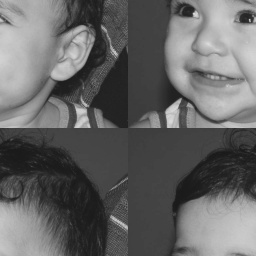
It asks to swap the areas of the input picture. Consider an image cutted in four parts:
| A | B |
| C | D |
what we are going to do is swap the positions of the areas A, B, C and D diagonally. This we will lead to:
| D | C |
| B | A |
Let’s do the magic!
Code
We start including dependencies. Let’s use iostream and opencv to, respectively, inform the user about any issue that may appear (the image was not opened correctly) and manipulate the picture.
Let’s set up namespaces also. They prevent name conflicts and save lazy coders from typing too much.
#include <iostream>
#include <opencv2/opencv.hpp>


using namespace cv;
using namespace std;
Now that everything is fine we need to allocate memory to the original image. Images are matrices, so we are going to use OpenCV Mat class to do that.
int main(int argc, char** argv){
  Mat image;
Let’s get the image. It will be passed to our code during its call, and to know how to do that please read here. It’s important to break the process if image opening goes wrong, in order to avoid greater troubles, so return 0.
  // checking image reading
  image= imread(argv[1],CV_LOAD_IMAGE_GRAYSCALE);
  if(!image.data){
    cout << "image could not be opened" << endl;
    return 0;
  }
We love to see pictures. Let’s visualize what we’re working on! Notice namedWindow and imshow does basically the same, but I believe there must be a difference between them. The waitKey is pretty straight forward, and its inner working is well-documented.
  namedWindow("Original Image",WINDOW_AUTOSIZE);
  imshow("Original Image", image);
  waitKey();
We will create our collage using Regions of Interest (ROI). I chose this way of doing this due to some references, but there may be other ways of doing so. Anyway… this way requires we define rectangles (our collage is basically swapt rectangles, see?), and these rectangles need height and width information to be created. So… to get this data, we just need to divide the image rows and cols by two.
  int dim_x = image.rows/2;
  int dim_y = image.cols/2;

  cout<<"dim_x = "<<dim_x<<"; dim_y = "<< dim_y<<endl;
Ok, now we must allocate memory to the processed image. The object processed_image receives a copy of image as its initialization.
  //creating clone image which will become the processed image
  Mat processed_image = image.clone();
Below I define the rectangular areas that captures the Regions of Interest. The Rect Class has four constructor parameters: the top left corner coordinates, the width and the height. If we consider the origin of the system at top left corner, the X axis points towards right and the Y axis points downwards.
  Rect A_area(0, 0, dim_x, dim_y);
  Rect B_area(dim_x,0 ,dim_x, dim_y);
  Rect C_area(0 , dim_y, dim_x, dim_y);
  Rect D_area(dim_x , dim_y, dim_x, dim_y);
Now we define our four parts A, B, C and D using the rectangular areas. It means A, B, C and D are images, as well!
  Mat A = image(A_area);
  Mat B = image(B_area);
  Mat C = image(C_area);
  Mat D = image(D_area);
The final product is the original rectangle with the four little images copied.
  A.copyTo(processed_image(D_area));
  B.copyTo(processed_image(C_area));
  C.copyTo(processed_image(B_area));
  D.copyTo(processed_image(A_area));
The process is done! We just need to show the processed picture.
  namedWindow("Processed Image",WINDOW_AUTOSIZE);
  imshow("Processed Image", processed_image);

  waitKey();


  return 0;
}
Example
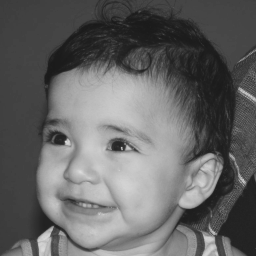
One example of code run can be seen below.

And here we can see, at the left, the original image, and at the right, the processed one.


Conclusion
The code explained in this post can be found here. There may be some trash I didn’t removed. Anyway… thanks for reading!
