
Basic OpenCV operations: dealing with pixels
OpenCV (Open Computer Vision Library) is an open source computer vision and machine learning software library. It has a lot of optimized algorithms for a wide range of applications (for example, object and face recognition). One way of learning to use it is trying to apply this tool to solve a computer vision like problem.
In this example let’s try to solve the first one here. Agostinho Brito Jr is a professor of Digital Image Processing at Universidade Federal do Rio Grande do Norte. You can find more about his work in his personal github page.
The question asks to invert the greylevel of an rectangular area inside one image. The user should input two points that will define the polygon (opposite vertices). Note it will give us the negative! Funny, isn’t it?
Ok, no more talking. Hands on!
Code
The first step is to include the dependencies. For our applications we need three: iostream, opencv and algorithm. The first one is necessary because we will need external input (and we will use cin for do that and cout to comunicate). The second one is our celebrity and the last one will be used to decide where the vertices are based on their value (greater value, farther from the origin).
We’ll set up namespaces also. They are important because they restrict the scope of certain named entities, thus preventing name conflicts. In our example, it will avoid our compiler get confused: it will know that cin and cout belongs to std and that imread belongs to cv2.
#include <iostream>
#include <opencv2/opencv.hpp>
#include <algorithm>    // std::min and std::max

using namespace cv;
using namespace std;
Ok, we have everything we need. Now we are going to dive in the function. Since we need to get an image from a folder and change its color (remember: we will change greylevels), let’s instantiate a Mat object. Mat is an OpenCV class to deal with n-dimensional dense arrays (basically what an image is).
int main(int argc, char** argv){
  Mat image;
Notice the user will input two points in order to draw a rectangle. So that to store this, we’ll use an array of ints:
int pts[2][2] = {{-1,-1},{-1,-1}}; // vertices positions
This array will store the second point after the first one. Each of them has two coordinates. I already initialized it.
The next step is to get the image. The process to input the picture can be seen here. Below we see the block that runs to store the pixels’ information as greylevels inside the image object.
  // checking image reading
  image= imread(argv[1],CV_LOAD_IMAGE_GRAYSCALE);
  if(!image.data)
    cout << "image could not be opened" << endl;
Now the image is saved, let’s get the vertices. An do-while loop ensures they are all valid (non-negative and don’t go beyond image size).
 //inputing  vertices and checking if they don't match image size
  do{
    cout<< "Please input the upper vertex: \n";
    cin>> pts[0][0] >> pts[0][1];
  }while(pts[0][0] < 0 || pts[0][0] > image.cols || pts[0][1] < 0 || pts[0][1] > image.rows );

  do{
    cout<< "Please input the lower vertex: \n";
    cin>> pts[1][0] >> pts[1][1];
  }while(pts[1][0] < 0 || pts[1][0] > image.cols || pts[1][1] < 0 || pts[1][1] > image.rows );
Now let’s see the original image… the namedWindow function creates an window with a title that is passed as a parameter; the other parameter (WINDOW_AUTOSIZE) makes it fit the displayed picture. The imshow does basically the same (yeah, I repeated myself, sorry ) and the waitKey makes the code wait for a pressed key.
namedWindow("Original Image",WINDOW_AUTOSIZE);
  imshow("Original Image", image);
  waitKey();
Now, the focus of our project: processing the image pixel-by-pixel. Let’s iterate using two for loops (the image is an bi-dimensional matrix): the first one runs the rows and the second one runs the lines. Notice how to use the std::min and std::max to decide where to start and end the loop. I used the scope operator (::) right there to exemplify how it is applied.
The pixels’ intensity goes between 0 and 255. The negative of a null intensity is its maximum value, and the negative of a maximum intensity is a null one. It indicates the equation we should use:
negative_intensity = 255 - original_intensity .
Ok, but how to do it using code? Well… if we need to access pixels’ values, we must use image.at. But we have to know, as well as the place to look at, the number of channels. It is a greyscale image, so it has just one channel. Since its value can change in 256 levels, we can use an unsigned char to store it.
  for(int i = std::min(pts[0][0],pts[1][0]); i < std::max(pts[0][0],pts[1][0]); i++){
    for(int j = std::min(pts[0][1],pts[1][1]) ; j < std::max(pts[0][1],pts[1][1]); j++){
      image.at<uchar>(i,j)= 255 - image.at<uchar>(i,j);
    }
  }
Now we just need showing this processed pic!
  imshow("Processed Image", image);

  waitKey();

  return 0;
}
Example
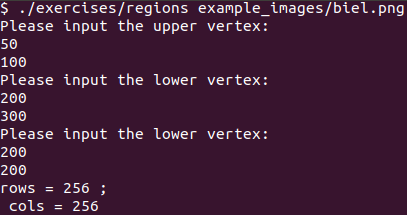
Below we can see how to run the code. Notice the first lower vertex input went wrong because it implies a point that does not exist (200,300 while the image is 256x256).
And here we can see, at the left, the original image, and at the right, the processed one.


Conclusion
The code explained in this post can be found here. If you go there, you’ll notice some trash that I didn’t remove. Anyway… thanks to stay until here!