Improving Labelling
Hey there! How are you all? Hope you’re healthy. At the moment of this post I am studying Digital Image Processing, under the tutelage of Agostinho Brito Jr. You can check out his online Digital Image Processing Classes by clicking on this link.
The Task and the Algorithm Idea
I’ll address the following task troughout this post:
It is known that counting scene objects is a very common task on Image Processing/Artificial Vision. This code addresses this task by enabling the counting of scene objects on binary images. Sometimes we need to do a finer counting by counting elements that belong to different classes. For example, suppose a binary image has several bubbles in it, and some of them have holes inside them, and some of them don’t. How many bubbles with no holes are there? How many bubbles of the other type? To make our counting even better, we need to disregard bubbles touching the image margin. How do we do this?
Professor Agostinho explains the pseudo-code for doing this during his labeling lesson. Right below I will summarize the main ideas:
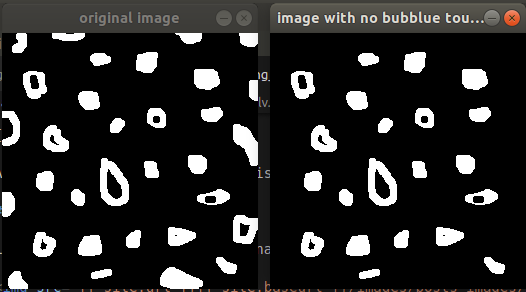
- the first thing to do is to remove bubbles that touches the margin. To accomplish this, iterate over the margin pixels and apply floodfill when you find any bubble. Remember: it is a binary image, and the black background has null intensity while the forefront objects has full intensity (255). Then, the floodfill’s seed parameter must be 0.
- Now the margin is clean. Apply Agostinho’s labeling algorithm to make all the remaining bubbles be filled with values inside the range \([1,254]\).
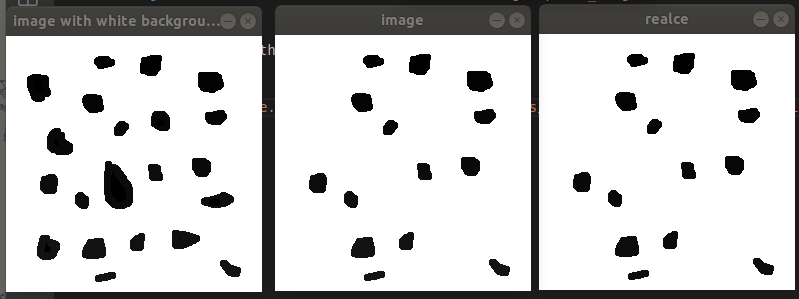
- Notice that every “bubble body” must be filled with values between 0 and 255. Notice the only areas with 0 value are the bubbles’ holes and the background. Apply floodfill with seed equal to 255 on the background, and the only remaining zero-filled areas will be the bubbles’ holes.
- Now iterate over the images’ pixels, going from the top-left until reaching the bottom-right. If we have found pixels with zero value, we have actually found a hole and hence a bubble with it. If we count every bubble with hole, the amount of bubbles with no hole is just the difference between all the known values and such value.
- To make our code work properly, every time we find a hole, we must floodfill it with seed equal to 255. We must floodfill the associated bubble also. To do this we just need to go back one pixel to the left and floodfill it. This will “erase” the bubble.
During the code explanation I will not highlight code comments. If you want to have access to the complete code, please check out my code on Github.
Code
#include <iostream>
#include <opencv2/opencv.hpp>

using namespace cv;

int main(int argc, char** argv){
  cv::Mat image, realce;
  int width, height;
  int nobjects,nobjects_hole;

  cv::Point p;
  image = cv::imread(argv[1], cv::IMREAD_GRAYSCALE);

  if(!image.data){
    std::cout << "imagem nao carregou corretamente\n";
    return(-1);

  width=image.cols;
  height=image.rows;
  std::cout << width << "x" << height << std::endl;
  }
The code begins with the proper imports: iostream and opencv. The first one deals with the input/output stream, while the last one is the default computer vision library.
The main function begins with the definition of the variables:
imagewill contain the image to be processed, andrealcewill be the the labeled image after being equalized. Such equalization is important for displaying;widthandheightwill containimageshape;nobjectsis the bubble counter, whilenobjects_holecounts the amount of bubbles with holes. Notice here that the amount of bubbles with no hole inside is just the difference betweennobjectsandnobjects_hole;pwill contain the pixel position. Such variable is needed as a parameter to the floodfill algorithm.
The image is read from the command line (remember: we will run the code in linux terminal). We check if it was properly read. If it was not, we finish the program. If so, we display the image dimensions.
  p.x=0;
  p.y=0;

  int colunas_esquerda_e_direita[2] = {0, width-1};
  int linhas_topo_e_fundo[2] = {0, height-1};

  int n_objects_removed = 0;
  cv::imshow("original image", image);

  for(int i=0; i < 2; i++){
    for(int j=0; j < width;j++){
      if(image.at<uchar>(linhas_topo_e_fundo[i],j) == 255){
        n_objects_removed++;
        p.x= j;
        p.y= linhas_topo_e_fundo[i];
        // preenche o objeto com a cor do fundo
        cv::floodFill(image,p,0);
      }
    }
  }

  for(int j=0; j < 2; j++){
    for(int i=0; i < height;i++){
      if(image.at<uchar>(i,colunas_esquerda_e_direita[j]) == 255){
        n_objects_removed++;
        p.x= colunas_esquerda_e_direita[j];
        p.y= i;
        // preenche o objeto com a cor do fundo
        cv::floodFill(image,p,0);
      }
    }
  }

  // nesse ponto do processe não há mais nenhuma bolha tocando as bordas
  std::cout<<"foram removidas "<<n_objects_removed<<" bolhas"<<std::endl;
  cv::imshow("image with no bubblue touching borders", image);
I arbitrary initialize the p coordinates as 0.
When I wrote this post I noted such initialization is useless, since such variable will be properly initialized during the following
for loop.
In order to avoid writing four outer for loops (since each of them will have another one inside them), I decided to create two arrays of particular positions:
colunas_esquerda_e_direita: this array contains the leftmost and rightmost column;linhas_topo_e_fundo: this array contains the top and bottom lines.
How will they be used? Let’s create two for nested loops : the first of them iterates over the first and last lines of the image; and the last one iterates over the first and last columns of the image. If any found pixel has intensity equal to 255 (a forefront object: a bubble), floodfill is applied (\(seed=0\)) and the bubble is erased.
It counts how many bubbles were erased also. It shows the original image and that without bubbles touching the margins as well.
  p.x=0;
  p.y=0;

  // busca objetos presentes
  nobjects=0;
  for(int i=0; i<height; i++){
    for(int j=0; j<width; j++){
      if(image.at<uchar>(i,j) == 255){
        // achou um objeto
        nobjects++;
        p.x=j;
        p.y=i;
  		// preenche o objeto com o contador
		  cv::floodFill(image,p,nobjects);
      }
    }
  }

  std::cout<<"Foram encontradas "<<nobjects<<" bolhas \n";
This part is default labeling: iterate over the image, from the top-left to bottom-right. Have you found any forefront pixel? Increments the associated counter (I mean, n_objects) and floodfill the bubble.
 // pintar o fundo com 255
  p.x = 0;
  p.y = 0;
  cv::floodFill(image,p,255);
  // nesse ponto do processo o fundo está branco
  std::cout<<"fundo branco"<<std::endl;
  cv::imshow("image with white background", image);
No bubble touches the margin, right? If we want to floodfill the background with 255, we can choose the top-left pixel as the algorithm seed parameter!
  // busca objetos com furos
  nobjects_hole = 0;
  for(int i=0; i<height; i++){
    for(int j=0; j<width; j++){
      if(image.at<uchar>(i,j) == 0){
        // achou um furo
        nobjects_hole++;
        p.x= j;
        p.y= i;
  		  // preenche o objeto com o contador
		    cv::floodFill(image,p,255);
        p.y--;
        cv::floodFill(image,p,255);
      }
    }
  }
Now the program iterates over the image looking for the pixels with values equal to 0. When it finds one, it applies floodfill with seed equal to 255 to it and to the pixel at the left-hand side. It increments the associated counter (nobjects_hole) also.
  std::cout << "a figura tem " << nobjects_hole << " bolhas com furos \n";
  std::cout << "a figura tem " << nobjects-nobjects_hole << " bolhas sem furos \n";
  cv::equalizeHist(image, realce);
  cv::imshow("image", image);
  cv::imshow("realce", realce);
  // cv::imwrite("labeling.png", image);
  cv::waitKey();
  return 0;
}
At the end of the program, it displays the counters and the processed image (original one and the equalized one).
Example
Let’s run the code on the terminal passing as argument the file path:
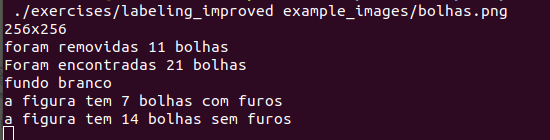
And here we can the result: