Equalize
Hey there! How are you all? Hope you’re healthy. At the moment of this post I am studying Digital Image Processing, under the tutelage of Agostinho Brito Jr. You can check out his online Digital Image Processing Classes by clicking on this link.
The Task
I’ll address the following task troughout this post:
The histogram of an image is a function that maps each gray level of an image to the number of times it occurs in the image. They are particularly useful to improve greyscale images with the greyscale intensities crowded in any end, through a process called histogram equalization. Throughout this post, I will introduce a code that applies histogram equalization on images captured from a laptop camera and show an example of the process capabilities. As it is detailed in Agostinho’s blog post about the task, the code must equalize a greyscale image, not the colorized version.
During the code explanation I will not highlight code comments. If you want to have access to the complete code, please check out my code on Github.
Code
#include <iostream>
#include <opencv2/opencv.hpp>

int main(int argc, char** argv){
  cv::Mat image, greyscale_image, equalized_greyscale_image;
  int width, height;
  cv::VideoCapture cap;
  int key;
The code begins with the proper imports: iostream and opencv. The first one deals with the input/output stream, while the last one is the default computer vision library.
The main function begins with the definition of the variables:
imagewill contain the image to be processed. Since I need to work with a greyscale image, let’s define a good variable for it:greyscale_image. Let’s define anotherMatobject that will receive the equalized greyscale image (equalized_greyscale_image);widthandheightwill containimageshape;cap: Class for video capturing from video files, image sequences or cameras (webcam, uh?);- The
keyobject will contain the keycode values for any key pressed during running.
The image is read from the command line (remember: we will run the code in linux terminal). We check if it was properly read. If it was not, we finish the program. If so, we display the image dimensions.
	cap.open(0);

  if(!cap.isOpened()){
    std::cout << "cameras indisponiveis";
    return -1;
  }

  cap.set(cv::CAP_PROP_FRAME_WIDTH, 640);
  cap.set(cv::CAP_PROP_FRAME_HEIGHT, 480);
  width = cap.get(cv::CAP_PROP_FRAME_WIDTH);
  height = cap.get(cv::CAP_PROP_FRAME_HEIGHT);

  std::cout << "largura = " << width << std::endl;
  std::cout << "altura  = " << height << std::endl;
The conection to the video capture device is opened (the 0 parameter indicates I want to open the first camera available). Then it’s checked out if the connection has been properly initialized.
Using cap.set() method I define the captured frame shape. It is arbitrary set to \((width,height) = (480,640)\). Such shape is read, saved using width and height and displayed on the terminal.
  while(1){
    cap >> image;
    cv::cvtColor(image,greyscale_image,6); //turn image to grey

    // equalizing histograms:
    cv::equalizeHist(greyscale_image,equalized_greyscale_image);

    //cv::namedWindow("image");
    cv::imshow("image", image);
    //cv::namedWindow("greyscale image");
    cv::imshow("greyscale image",greyscale_image);
    cv::imshow("equalized greyscale image",equalized_greyscale_image);
    key = cv::waitKey(30);
    if(key == 27) break;
    if(key == 32){
      //salvar imagens
      cv::imwrite("./exercises_images/greyscale_image.png",greyscale_image);
      cv::imwrite("./exercises_images/equalized_greyscale_image.png",equalized_greyscale_image);
      std::cout<<"imagens salvas!"<<std::endl;
    }
  }
  return 0;
}
The previous loop forms the spine of the code. It continually processes the frames (image) acquired by the cap object.
The first thing to do is to convert the frames to greyscale using cv::cvtColor(). The parameter 6 is a code to indicate I want to convert from BGR to Gray.
When cv::equalizeHist is applied, the original image is mapped onto the equalized one. This equalized one will have better constrast, because its histogram will be more strechted.
The code ends reading any key pressed. If esc is pressed, the program stops running. If spacebar is pressed, the program saves the images.
Example
Let’s run the code on the terminal:
$ ./exercises/equalize
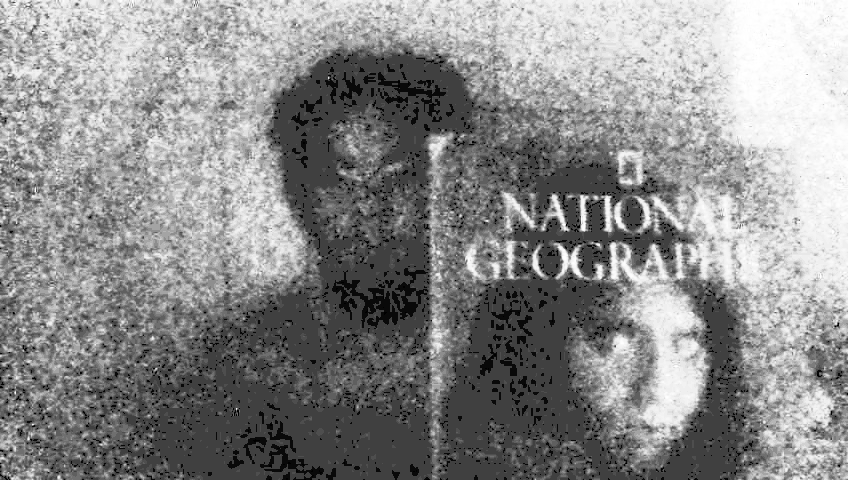
And here we can the result (the first one is the original greyscale image and the last one is the equalized greyscale one):
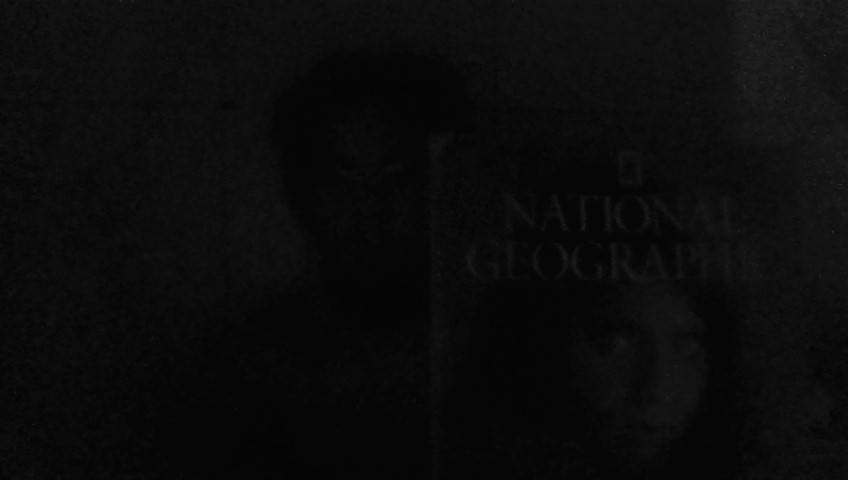
Notice how dark the original image is. We barely can see the name in front of the book (National Geographic), my face or the photography on the book cover.
After the histogram equalization, the words become more readable. We can see the rectangular logo of the famous magazine at the top of the book. We can see a face on the book also: the famous picture of Sharbat Gula taken by photojournalist Steve McCurry.
My ghostly face can be seen better in the equalized image. I hope it does not haunt anyone XD.